最近小程序特别火,笔者也来一探究竟!
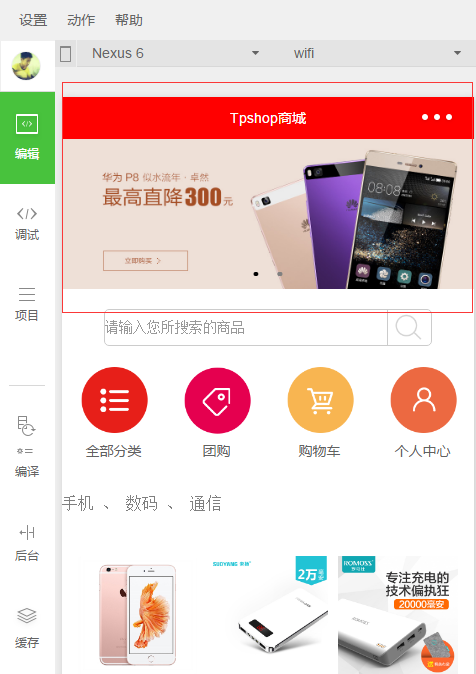
这次我们采用了tpshop开源框架与微信小程序接口写了一个简单的轮播图栗子!
效果展示:

实现思路:
通过小程序post请求调取toshop接口返回json数据,之后利用小程序标签swiper 来实现轮播图效果!!!
代码示例:
准备工作:
因为我们要使用md5来加密生成与接口的秘钥而js中没有PHPmd5方法,所以我们需要添加一个小程序版的md5.js 文件
md5.js 本文第一部分即是
因为我们post提交值 但是我们传值必须要转译一下,所以我们在util.js文件中加入以下代码:
- function json2Form(json) {
- var str = [];
- for(var p in json){
- str.push(encodeURIComponent(p) + "=" + encodeURIComponent(json[p]));
- }
- return str.join("&");
- }
- module.exports = {
- json2Form:json2Form,
- }
下面展示代码: index.js 请求接口
- //index.js
- //获取应用实例
- // pages/shop/index.js
- var utilMd5 = require('../../utils/md5.js');
- var util = require('../../utils/util.js');
- Page({
- data:{
- duration: 2000,
- indicatorDots: true,
- autoplay: true,
- interval: 4000,
- loading: false,
- plain: false
- },
- onLoad:function(options){
- //获去轮播信息
- var that = this;
- var username = '13800138006';
- var password = '123456';
- var unique_id = '789789';
- var key = 'shop';
- var time = Date.now();
- var sign = utilMd5.hexMD5(password+unique_id+username+time+key);
- console.log(time);
- console.log(sign);
- // that = this;
- wx.request( {
- url: "https://www.mytpshop.com/index.php?m=Api&c=Index&a=home",
- header: {
- "Content-Type": "application/x-www-form-urlencoded"
- },
- method: "POST",
- data: util.json2Form( {
- username: username,
- password: password,
- unique_id: unique_id,
- time : time,
- sign : sign
- }),
- success: function(res) {
- that.setData({
- bannerImg: res.data.result.ad,
- goodsList: res.data.result.goods
- })
- console.log(res.data)
- console.log(res.data.result.ad),
- console.log(res.data.result.goods)
- }
- })
- // 页面初始化 options为页面跳转所带来的参数
- },
- onReady:function(){
- // 页面渲染完成
- },
- onShow:function(){
- // 页面显示
- },
- onHide:function(){
- // 页面隐藏
- },
- onUnload:function(){
- // 页面关闭
- }
- })
index.wxml
- <!--index.wxml-->
- <!--轮播 -->
- <view class="banner" >
- <swiper indicator-dots="{{indicatorDots}}" autoplay="{{autoplay}}" class="banners" interval="{{interval}}" duration="{{duration}}">
- <block wx:for="{{bannerImg}}" wx:key="{{banner}}">
- <swiper-item class="banner" >
- <image src="{{item.ad_code}}" data-id="{{item.ad_link}}" bindtap="bindViewTap" class="banner-image" />
- <!--<text class="banner-title">{{item.ad_name}}</text>-->
- </swiper-item>
- </block>
- </swiper>
- </view>
index..wxss
- .swiper{
- width:100%;
- height:300rpx
- }
- swiper image{
- width:100%;
- height:300rpx
- }
之后就完成操作了!!!!!!


