大多数的商城类小程序都有这个功能,点击“全部订单”,“待付款”,“待发货”,“待收货”,“已完成”,会跳转页面且跳至与之相对应的选项卡中。所以我们在开发该小程序时也做了相同的功能。如下图:
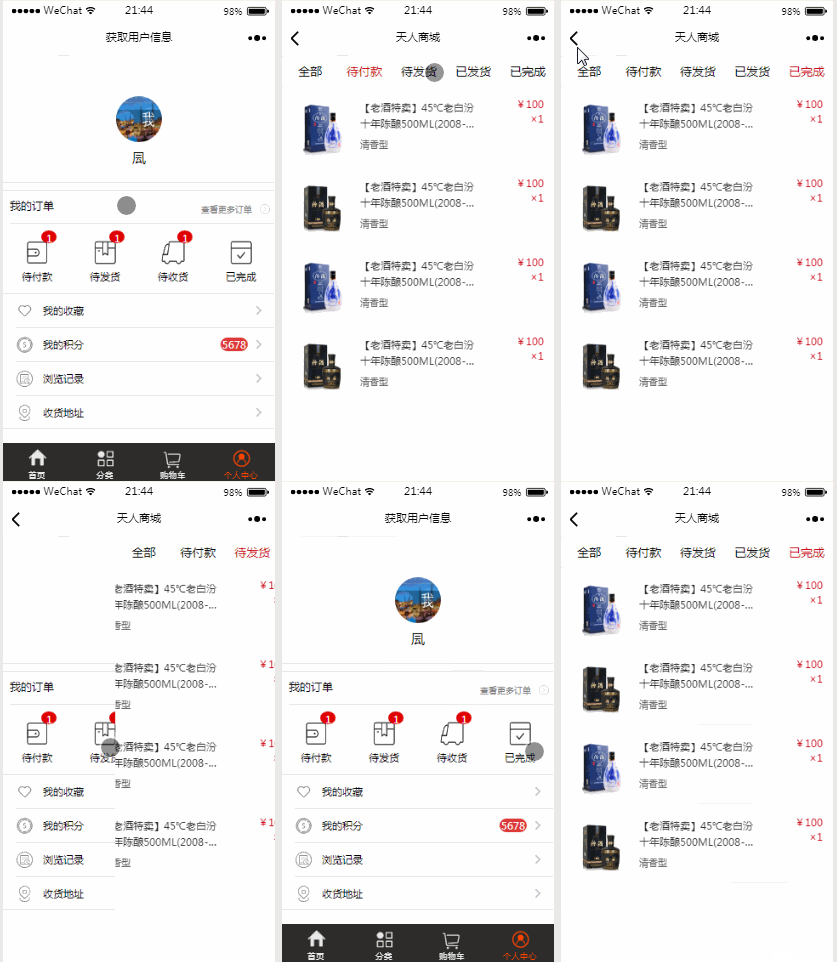
但是我们在最后做交互的时候,并没有使用该效果,下篇再说这个!先说说这个效果是如何实现的!
选项卡静态布局思路: 主要用到 scroll-view与 swiper标签,选项卡切换主要依靠 swiper 中的 current 属性,不懂请自行查看小程序API。
跳转页面且跳至与之相对应的选项卡思路:
首先在 app.js 中配置 globalData。
在“个人中心” js 文件中配置点击该项跳转至与之对应的 tab 的 index。
在“个人中心”跳转页面时通过 globalData 传递 index 给“全部订单”页面,“全部订单”页面通过 app.globalData.currentLocation 接受数据,改变选项卡的切换。
app.js 代码
-
globalData: {
-
userInfo: null
-
}
个人中心 wxml 代码
-
<!--九宫格 -->
-
<view class="page">
-
<view class="page__bd">
-
<view class="weui-grids">
-
<view class="allrec" bindtap="allForm">
-
<text>我的订单</text>
-
<view class="more">查看更多订单</view>
-
<image class='moreImg' src='../../img/more.png'></image>
-
</view>
-
<!--待付款 -->
-
<view class="weui-grid" hover-class="weui-grid_active" bindtap="noPay">
-
<image class="weui-grid__icon" src="../../img/wallet.png" />
-
<view class="weui-badge" hidden="{{false}}">{{badgeNum1}}</view>
-
<view class="weui-grid__label label">待付款</view>
-
</view>
-
-
<!--待发货 -->
-
<view class="weui-grid" hover-class="weui-grid_active" bindtap="noSend">
-
<image class="weui-grid__icon" src="../../img/wallet-1.png" />
-
<view class="weui-badge" hidden="{{false}}">{{badgeNum1}}</view>
-
<view class="weui-grid__label label">待发货</view>
-
</view>
-
-
<!--已发货 -->
-
<view class="weui-grid" hover-class="weui-grid_active" bindtap="sended">
-
<image class="weui-grid__icon" src="../../img/wallet-2.png" />
-
<view class="weui-badge" hidden="{{false}}">{{badgeNum1}}</view>
-
<view class="weui-grid__label label">待收货</view>
-
</view>
-
-
<!--已完成 -->
-
<view class="weui-grid" hover-class="weui-grid_active" bindtap="completed">
-
<image class="weui-grid__icon" src="../../img/wallet-3.png" />
-
<view class="weui-grid__label label">已完成</view>
-
</view>
-
</view>
-
</view>
-
</view>
个人中心 js 代码
-
var app = getApp()
-
var util = require('../../utils/util.js')
-
var formatLocation = util.formatLocation
-
-
Page({
-
data: {
-
},
-
// 指定 全部订单 和 九宫格中按钮 点击跳转至 选项卡中 与之对应的tab
-
allForm:function(){
-
app.globalData.currentLocation = 0,
-
wx.navigateTo({ url: '../orderForm/orderForm' })
-
},
-
noPay:function(){
-
app.globalData.currentLocation = 1,
-
wx.navigateTo({ url: '../orderForm/orderForm' })
-
},
-
noSend
|


