qjlx: function() {
var itemList = ['病假', '事假'];
wx.showActionSheet({
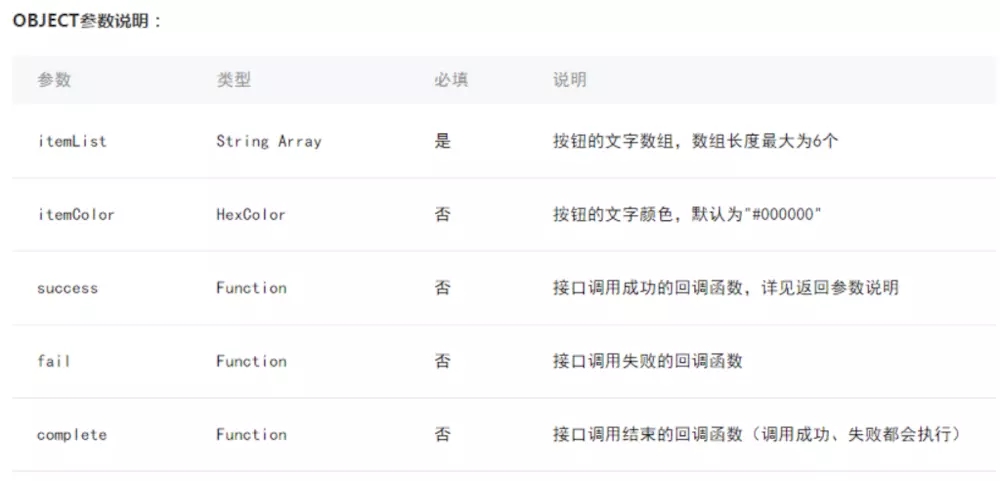
itemList: itemList,
success: function(res) {
console.log(res);
console.log(itemList[res.tapIndex]);
},
fail: function(res) {
console.log(res.errMsg);
}
})
},
|
操作菜单——wx.showActionSheet(OBJECT)
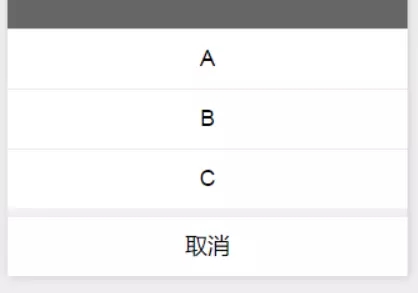
效果
效果
//获取应用实例
var app = getApp()
Page({
actioncnt:function(){
wx.showActionSheet({
itemList: ['A', 'B', 'C'],
success: function(res) {
console.log(res.tapIndex)
},
fail: function(res) {
console.log(res.errMsg)
}
})
}
})
|
弹出框
-
<view class='item'>
登录密码
<view class='bk'>
<input class="textarea" placeholder="{{password}}" value='{{password}}' bindinput="password" maxlength='100' auto-height disabled/>
</view>

<button class='btn' bindtap='dlmm'>修改</button>
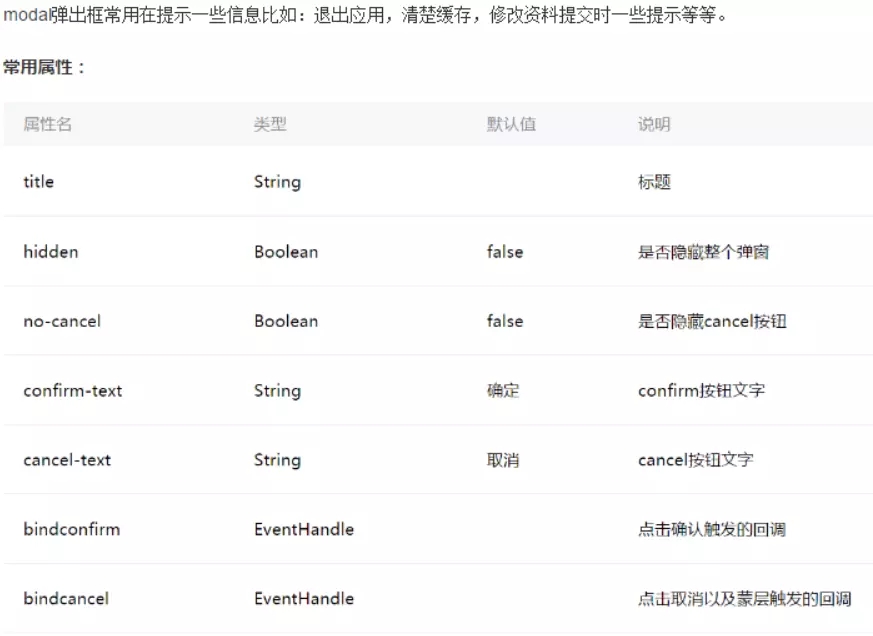
<modal hidden="{{hiddenmodalput}}" title="修改密码" confirm-text="提交" cancel-text="取消" bindcancel="cancelM" bindconfirm="confirmM">
<input bindinput='ipsd' type='text' placeholder="请输入原密码..." auto-focus/>
<input bindinput='newipsd' type='password' placeholder="请输入新密码..." />
</modal>

</view>
// js
// 获取登录密码:
password: function(e) {
this.setData({
password: e.detail.value,
})
console.log("获取登录密码:" + this.data.password);
},
// 修改登录密码
dlmm: function(e) {
this.setData({
hiddenmodalput: !this.data.hiddenmodalput
})
},
cancelM: function(e) {
this.setData({
hiddenmodalput: true,
})
},

confirmM: function(e) {
var that = this;
console.log("原密码" + that.data.psd + "新密码" + that.data.newpsd);
that.setData({
hiddenmodalput: true,
})
wx.request({
url: '',
method: 'POST',
header: {
'Authorization': 'Bearer' + wx.getStorageSync('token'),
},
success(res) {
if (res.data.code == 0) {
wx.showToast({
title: '保存失败',
icon: 'success',
duration: 500
})
} else {
that.getShowToast();
}
}
})
},

ipsd: function(e) {
this.setData({
psd: e.detail.value
})
},
newipsd: function(e) {
this.setData({
newpsd: e.detail.value
})
},
|
指定modal弹出
效果
-
<!--show.wxml-->
<view class="container" class="zn-uploadimg">
<button type="primary"bindtap="modalinput">modal有输入框</button>
</view>
<modal hidden="{{hiddenmodalput}}" title="请输入验证码" confirm-text="提交" cancel-text="重置" bindcancel="cancel" bindconfirm="confirm">
<input type='text'placeholder="请输入内容" auto-focus/>
</modal>
-
//获取应用实例
var app = getApp()
Page({
data:{
hiddenmodalput:true,
//可以通过hidden是否掩藏弹出框的属性,来指定那个弹出框
},
//点击按钮痰喘指定的hiddenmodalput弹出框
modalinput:function(){
this.setData({
hiddenmodalput: !this.data.hiddenmodalput
})
},
//取消按钮
cancel: function(){
this.setData({
hiddenmodalput: true
});
},
//确认
confirm: function(){
this.setData({
hiddenmodalput: true
})
}

})
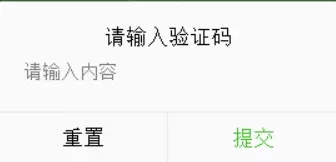
效果
-
//获取应用实例
var app = getApp()
Page({
actioncnt:function(){
wx.showActionSheet({
itemList: ['A', 'B', 'C'],
success: function(res) {
console.log(res.tapIndex)
},
fail: function(res) {
console.log(res.errMsg)
}
})
}
})
-
<!--.wxml-->
<view class="container" class="zn-uploadimg">
<button type="primary"bindtap="modalinput">modal有输入框</button>
</view>
<modal hidden="{{hiddenmodalput}}" title="请输入验证码" confirm-text="提交" cancel-text="重置" bindcancel="cancel" bindconfirm="confirm">
<input type='text'placeholder="请输入内容" auto-focus/>
</modal>

//.js
//获取应用实例
var app = getApp()
Page({
data:{
hiddenmodalput:true,
//可以通过hidden是否掩藏弹出框的属性,来指定那个弹出框
},

//点击按钮痰喘指定的hiddenmodalput弹出框
modalinput:function(){
this.setData({
hiddenmodalput: !this.data.hiddenmodalput
})
},
//取消按钮
cancel: function(){
this.setData({
hiddenmodalput: true
});
},
//确认
confirm: function(){
this.setData({
hiddenmodalput: true
})
}
})


